rabbit's Guide to Installing, Clustering, & Enabling Validation on rippled Nodes
This guide builds on our previous guide, in which we deployed and secured a CentOS 7 or 8 install. Examples in this guide are generally tailored to CentOS 7 & 8, although they apply to rippled.cfg instances running on diverse operating systems.
We are in no way responsible for your security, and, by using this guide, you agree not to hold us liable for your security.
I tried to note any text that you need to customize in a different color.
Table of Contents
Resources
- Ripple's Official rippled Setup Guide
- Ripple's Official API Reference
- Ripple's rippled Git
- Ripple's Example rippled.cfg File
- rippled Google group
- The rippled.cfg template from this tutorial is available in my Git repository
- The Technical Discussion section on XRP Chat has lots of useful posts and information
- The #devcenter channel on the Real Zerpbox on Discord is a great place to ask questions and chat
- @WietseWind developed a docker repository
- @zapstergateway has some useful scripts and information related to deploying rippled nodes on Azure on his Git repo
- https://bithomp.com has many useful tools, including information on rippled nodes
Installing rippled
When installing rippled, please refer to Ripple's Official rippled Setup Guide.
Ensure your system has a minimum of 8GB RAM (16+ is ideal) and a 50+GB solid state drive.
If you are running RHEL or CentOS 7/8, you can use Ripple's software repository to install and update rippled. To add the software repository, create a new file for the repo:
				cat << REPOFILE | sudo tee /etc/yum.repos.d/ripple.repo

				[ripple-stable]

				name=XRP Ledger Packages

				enabled=1

				gpgcheck=0

				repo_gpgcheck=1

				baseurl=https://repos.ripple.com/repos/rippled-rpm/stable

				gpgkey=https://repos.ripple.com/rippled-rpm/stable/repodata/repomd.xml.key
In this code snippet:
- Everything starting with "[ripple-stable]" is copied into a file located in "/etc/yum.repos.d/rippled.repo". This file is used by yum (the package manager in CentOS) when installing or updating rippled.
- "enabled=1" tells yum to use this repository every time it checks for updates. If you don't want rippled to update when you run "yum update", then change this to "enabled=0". If you disable the repository, you will have to tell yum to use it when you want to update.
- "gpgcheck=0" tells yum that the packages in the repository are not signed using GPG, thus, their signatures should not be verified.
- "repo_gpgcheck=1" tells yum that the repository is signed using GPG, and yum should verify this signature (using the key specified in "gpgkey").
- "baseurl" is the url from which the software will be
downloaded.
- You can replace "stable" in the URL with "nightly" or "unstable", if you want to test the latest builds.
- "gpgkey" is the location of the GPG key that is used to verify the repository.
Once you have added the rippled repository, you are ready to install rippled. If you aren't running CentOS, you will need to compile rippled from source code, which is outside the scope of this tutorial. If you are running Debian, Ubuntu, or similar, you can use alien to install rippled. Instructions for using alien are available in the Official Ripple Setup Guide.
Install rippled:
sudo yum install --enablerepo=ripple-stable rippled
The "--enablerepo=ripple-stable" tells yum to use the stable branch of the rippled software repository, so you are running the current version of rippled.
Configuring rippled
Now that we have installed rippled, we will need to edit the default configuration file, before we can start rippled. The default configuration file lives at "/etc/opt/ripple/rippled.cfg". Before we make any changes, lets backup the default file, which is a great resource, since it is very well commented. To backup the file to your home directory, run:
cp /etc/opt/ripple/rippled.cfg /home/username/rippled.cfg.bu
We use the cp command to copy the file. Make sure you change "username" in the above example to your username. After you run the command, you should be able to see the file "rippled.cfg.bu" in your home directory.
I have a basic rippled.cfg template on my Git. Download the configuration file using:
				wget -O /home/username/rippled.cfg
				https://raw.githubusercontent.com/crypticrabbit/rippled-examples/master/rippled.cfg
Make sure to change "username" to your username.
Edit/review the configuration file:
nano /home/username/rippled.cfg
You can use your favorite text editor (nano, vi, etc.) instead of nano. Replace "username" with your username. If you are using our rippled.cfg template, it has been tested and runs on CentOS 7 & 8 without changing any settings.
Inside the configuration file, you will see several sections. You can read about each of the sections in the example rippled.cfg file. The configuration file from my Git uses NuDB, rather than RocksDB, since NuDB provides optimal performance on solid state drives (SSD). Note that comments in the rippled.cfg file begin with a hash "#". rippled will not read any line that begins with "#" when it loads the rippled.cfg file.
Once you have made any changes to the rippled.cfg file, or if you decided to use the default template, copy the .cfg file into the "/etc/opt/ripple" directory, so that rippled will read the configuration file when it starts:
sudo cp /home/username/rippled.cfg /etc/opt/ripple/rippled.cfg
You will likely need to accept a prompt informing you that you are overwriting the existing file. Since we already backed up the default rippled.cfg file, you can safely overwrite the existing file.
systemctl
systemctl is used to control services that are running on Linux systems. We will use systemctl to start our rippled node:
sudo systemctl start rippled
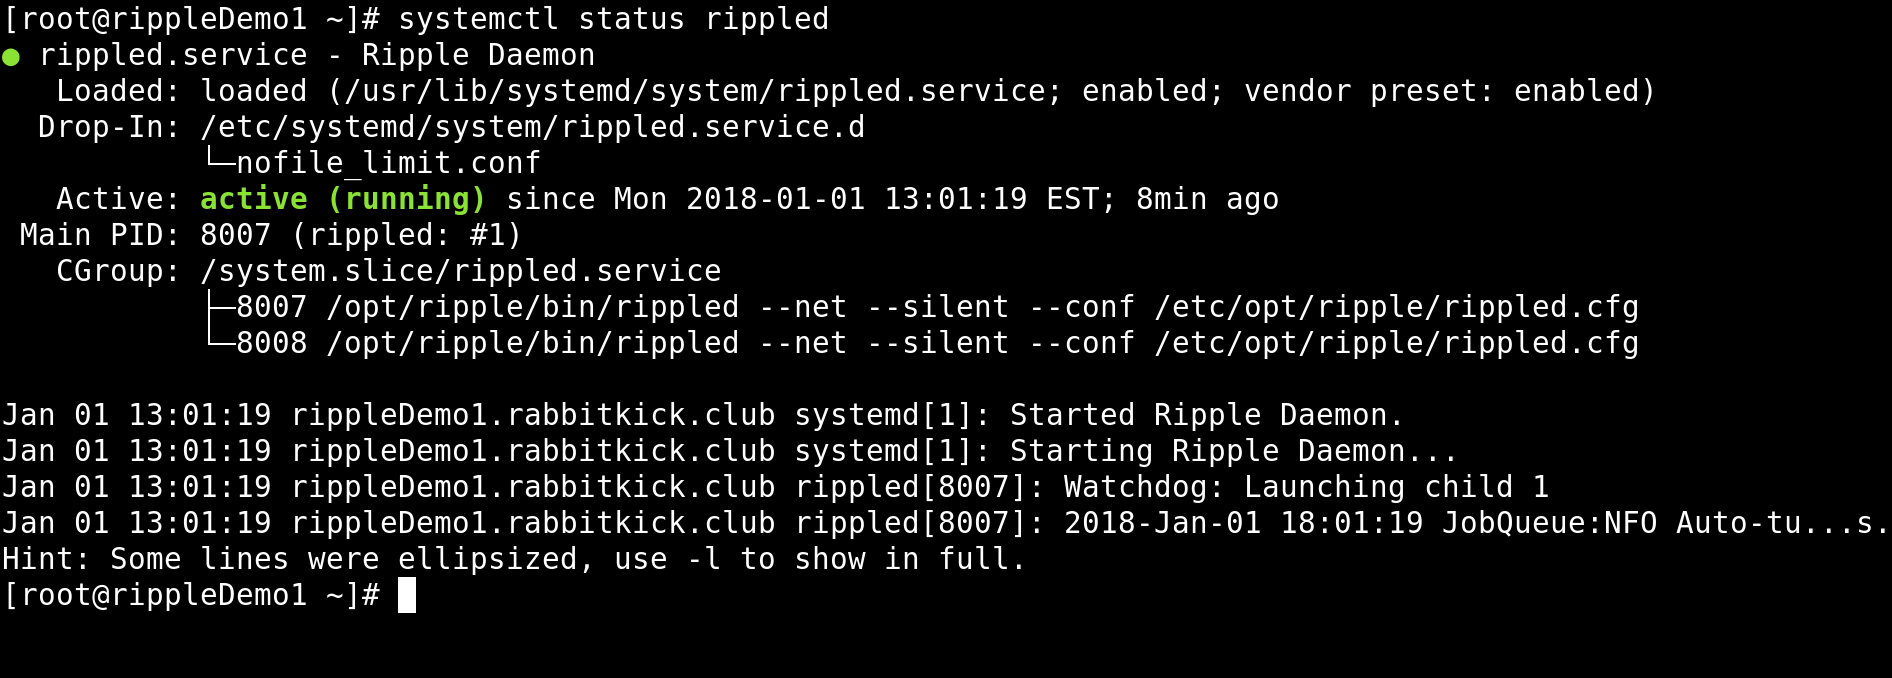
We can also use systemctl to check that our rippled successfully started:
sudo systemctl status rippled
If rippled is running, the output from the command will indicate that it is "active (running)".
If rippled started successfully, you can use systemctl to enable rippled every time your system boots:
sudo systemctl enable rippled
If you don't get an error message, then rippled should start every time you restart your computer, as long as there isn't a problem with the rippled.cfg file.
Troubleshooting Errors
By default, rippled will save log files to "/var/log/rippled/debug.log". If you are having problems starting rippled, or you don't think that your rippled is syncing to the network, check the log file.
If you can see that rippled is running, but you are not sure if it is syncing with the rest of the network, you can check rippled's state by running:
/opt/ripple/bin/rippled server_info
"/opt/ripple/bin/rippled" is the default path to the running rippled process. You can use that path to run any of the rippled API commands. The "server_info" command is used to get basic information about rippled. The "peers : xx" tells you how many other rippled nodes your node is connected to. The "server_state : xxxx" tells you how your node is participating in the network. You can see all of the different server states in Ripple's documentation. If you are running a non-validating (stock) rippled node, your server state will be "full" if it is fully in sync with the network. If you are running a validating node, your server state will be "proposing" if your node is actively proposing which version of the ledger should be validated. To learn what all of the information that the "server_info" command returns means, check out the Ripple's rippled API Reference.
If you want to see what other rippled nodes your node is connected to, run:
/opt/ripple/bin/rippled peers
The command will return detailed information including IP address, which versions of the ledger the peer has available (complete_ledgers), whether the peer is following the rules (sanity), and lots of other information. A dictionary for the outputs from the command is posted on Ripple's rippled API Reference.
Updating rippled
It is important to keep rippled up to date, so that your node agrees with and is following the same rules as the rest of the network. If you are running a validating node, we strongly suggest manually updating. Trusted validating nodes must have as close to 100% uptime as possible. It is possible that updating rippled (or your server's operating system) could cause rippled to crash. If you are manually updating, you will be able to troubleshoot.
Manually Updating rippled
To manually update rippled (assuming you have "enabled=0" set in your /etc/yum.repos.d/rippled.repo), you can run:
sudo yum update --enablerepo=ripple-stable rippled
Otherwise, if you have "enabled=1" set in /etc/yum.repos.d/ripple.repo, you can run:
sudo yum update
After installing an update, gracefully shut down rippled to reduce the time it takes rippled to sync with the network when it is restarted. To gracefully shutdown rippled, use the 'stop' command:
/opt/ripple/bin/rippled stop
Note that it can sometimes take rippled excessively long to stop, so use (h)top or "systemctl status rippled" to ensure that rippled has stopped. After confirming rippled has stopped, you can finish applying the update by running:
				sudo systemctl daemon-reload

				sudo systemctl start rippled
Automatically Updating rippled
If you prefer to automatically update rippled, you can enable a cron job to do so, at a time interval that is convenient for you. Automatic updates are convenient and are a great way to bolster security by staying up to date. However, automatic updates do carry risk, for example, if someone malicious takes over the software repository. We do not recommend automatically updating high stakes/production servers.
To enable automatic rippled updates, install the cronie package:
sudo yum install cronie
Once the package is installed, we will create a "crontab" entry, so that cronie knows to automatically check for rippled updates. To edit the crontab file run:
sudo crontab -e
We will add an entry to the file that tells cronie to run a script (located at "/opt/ripple/bin/update-rippled.sh") periodically. The script is automatically installed when you install rippled from Ripple's software repository. Paste the following lines into the open file:
RANDOM_DELAY=590 4 * * 2,6 /opt/ripple/bin/update-rippled.sh
Ensure that you leave one blank line at the end of the file, as this signifies the end of the command to cronie. You can change the values in the code, based on your personal preferences.
- "RANDOM_DELAY=59" tells cronie that the command should be run at a random time within 59 minutes of the specified start time. This enables us to ensure that Ripple's software repository is not accidentally DDoSed by every node on the network checking for updates at the exact same time.
- "0 4 * * 2,6" defines the start time for the command. The time is
written in the format "minute hour day_(of the month) month weekday",
with a space separating each field. Thus, the "0" specifies that this
command should start 0 minutes after the fourth ("4") hour. "* *"
indicates that this should be run every day of every month. The "2,6"
allows us to further specify that the command should only be run on the
second (Tuesday) and sixth (Saturday) days of the week. Thus, every
Tuesday and Saturday at 4:00 am, the server will generate a random
number, based on the "RANDOM_DELAY" field, and the command will run that
many minutes later. By checking for and installing updates twice a week,
we are able to monitor the Ripple
Dev Blog as well as the Ripple
Network Topology webpages, to ensure the updates are not
negatively impacting other nodes' availability.
- To learn more about specifying when cronie should run commands, check out crontab.guru
- "/opt/ripple/bin/update-rippled.sh" is a script that comes with rippled. It contains essentially the same commands as the manual update section on this page.
Clustering rippled Nodes
You can run a validator on the ripple network without clustering nodes. The downside of this is that your IP address is exposed to the ripple network. If you plan to only run one validating node, skip ahead to the Enabling Validation section of this guide.
Multiple rippled nodes can be clustered with one another to improve efficiency since:
rippled Setup Guide
- Clustered rippled servers share the work of cryptography. If one server has verified the authenticity of a message, the other servers in the cluster trust it and do not re-verify.
- Clustered servers share information about peers and API clients that are misbehaving or abusing the network. This makes it harder to attack all servers of the cluster at once.
- Clustered servers always propagate transactions throughout the cluster, even if the transaction does not meet the current load-based transaction fee on some of them.
Before you begin, ensure that you allow inbound and outbound connections to/from port 51235 TCP on the interface that you will use to cluster the nodes.
We recommend creating additional rippled nodes using a clean install, however, some node operators may deploy additional nodes by cloning a disk image. If you decide to create additional nodes by cloning the disk image from your original node, stop rippled before cloning ("sudo systemctl stop rippled"), so databases are not corrupted during the process. Also, ensure you set unique disk encryption and user passwords. You will also need to delete the wallet.db file, so that your new node does not try to use the same node seed as the original node:
				sudo rm /var/lib/rippled/db/wallet.db

				systemctl restart rippled
Generating Keys
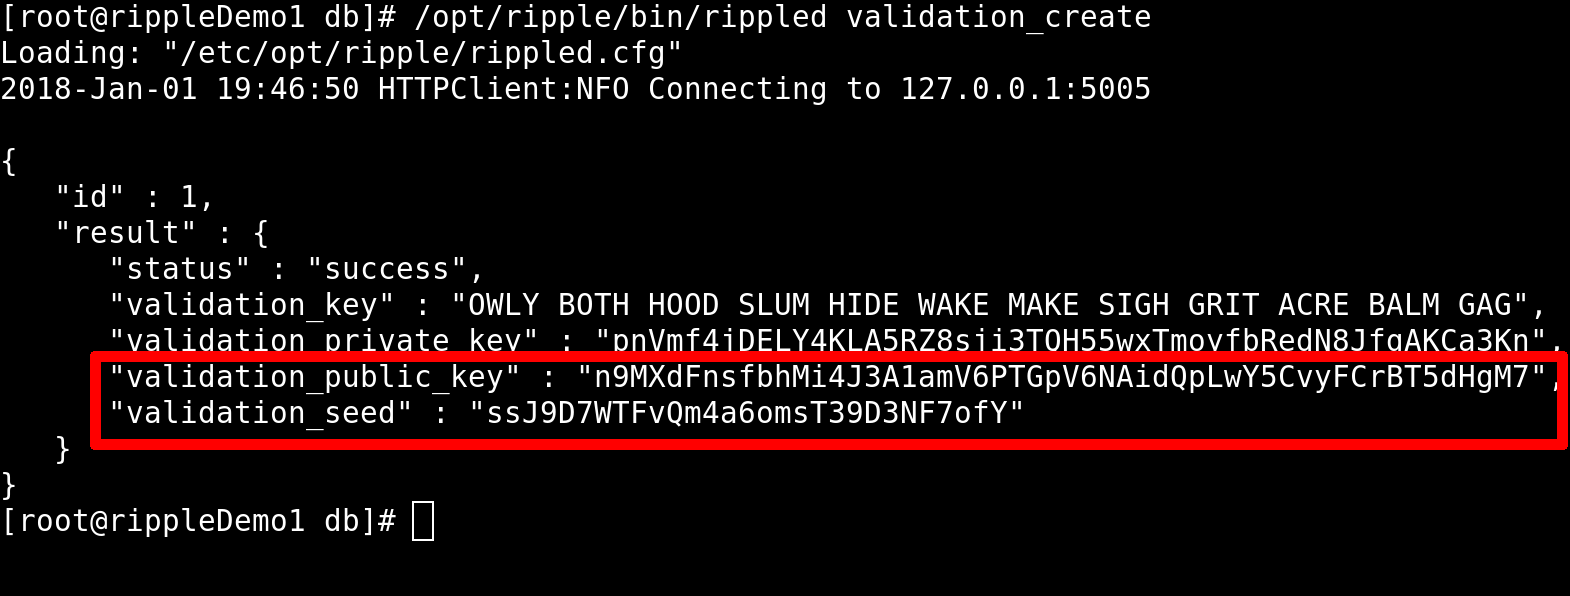
Clustered rippled nodes essentially use public/private key pairs to sign and verify data. We will use rippled to run the "validation_create" command:
/opt/ripple/bin/rippled validation_create
This command must be run on every node that will be part of the cluster. Store the results in a secure file, ideally backed up in multiple locations.
The "validation_create" command generates a secure seed, as well as public and private keys. To cluster nodes, we will need the values for "validation_public_key" and "validation_seed".
Updating rippled.cfg
Edit your rippled.cfg file on each node:
sudo nano /etc/opt/ripple/rippled.cfg
Uncomment the "[node_seed]" and "[cluster_nodes]" sections. Under node seed, paste the "validation_seed" that you obtained by running the "validation_create" command on the node. Use the value from our above screenshot, our rippled.cfg would look like this:
[node_seed]ssJ9D7WTFvQb4m8omsT39D3NF7ofY
Under the "[cluster_nodes]" section, add the "validation_public_key" outputs for all of the other servers in the cluster. On the node that generated the above secret key, "ssJ9D7WTFvQb4m8omsT39D3NF7ofY", the "[cluster_nodes]" section contains a key that was generated by a different node in our cluster:
[cluster_nodes]n9LoZrLqbUqwuWykvs4tw1FeYj2cCJPNm35LA62LJCASWUmMSPPM
Remember, the node seed goes on the same server that generated it. The public keys go on all of the other servers in the cluster.
You will also need to uncomment and update the "[ips_fixed]" section of your rippled.cfg files on each node in the cluster. Add the ip addresses for all of the other nodes in your cluster. In this example, I am clustering two nodes that are on the same virtual LAN. The first node has the IP address "10.0.0.1" and the second has the ip address "10.0.0.2". The node with the "10.0.0.2" IP address will have the following in its rippled.cfg:
[ips_fixed]10.0.0.1 51235
The node with the "10.0.0.1" IP address will have this in its rippled.cfg file:
[ips_fixed]10.0.0.2 51235
The "[ips_fixed]" configuration parameter tells rippled that it should always try to connect to the nodes at the IP addresses you specify. Because both nodes are listening for peer protocol connections on port 51235, I have also specified that the nodes are reachable on that port.
Now that we have generated key pairs for each of the nodes in the cluster and updated each node's rippled.cfg file, we need to restart rippled, so our changes take effect:
systemctl restart rippled
Verify that rippled is running:
systemctl status rippled
If you are having trouble, you may find the commented rippled.cfg file in my Git repository useful..
Enabling Validation
While you don't need to have multiple nodes clustered to enable validation, for the purpose of this guide, we will assume that you have already clustered the node that you want to become a validator with a second, non-validating, rippled node. The benefits of clustering are that we can set "[peer_private]" to "1", which will prevent our validator's IP address from being forwarded to the rest of the network. Clustering with multiple non-validating nodes is beneficial, as the redundancy can prevent the validating node from going offline.
Before You Begin
Consider the extent to which you are prepared to operate a validating node on the XRP ledger. While operating a validator is technically no more difficult than operating a non-validating node, operating the validating nodes entails additional commitments to security and trust building. In order for your validator's proposals to matter, it must be trusted by other node operators on the network. This requires your building relationships with operators, publicly identifying yourself, and having open conversations about why others should trust you not to maliciously collude with Ripple or other network operators. Operating a validating node also requires proficiency as a server administrator, as a validator with low uptime is unlikely to gain trust.
To establish trust as a validator operator, you will need to practice strong security. This includes running minimal software on rippled nodes and avoiding installing web, email, or other server software on your rippled nodes. Each incoming connection represents a security risk and a potential target for a DoS attack. It is important to restrict incoming connections on validating nodes to the bare minimum, such as SSH and perhaps a websocket connection for monitoring the node.
For most people who interact with the XRP ledger, a non-validating node will suffice. You can access transaction data and send and receive transactions through a non-validating node.
If you feel prepared to commit to running a validating node, then you simply need to generate and install keys.
Generating Keys
To enable validation, we will need to generate an additional key pair. After we generate this key pair, our validating server will actually have three different public keys that it can use to identify itself. The first key pair was generated automatically when we started rippled. This key pair is stored in "/var/lib/rippled/db/wallet.db". We generated the second key pair, which each node in our cluster uses to identify itself with other nodes. We will generate the third key pair, and our validating node will use it to sign versions of the ledger that it is proposing to the network. Other validators on the network can include our public key in their "[validators]" list, if they want to trust us as a validator.
To generate a key pair, use the validator-keys tool, which is included with rippled:
/opt/ripple/bin/validator-keys create_keys
If the command completes successfully, you will get a message stating that the "Validator keys stored in ~/.ripple/validator-keys.json". You can use a text editor to view the contents of the file:
nano ~/.ripple/validator-keys.json
Ensure you replace the path in the above command with the path specified by the output from the "create_keys" command. The file's contents contain your validator's public key. Once your validator is up and running, you can check that the public key is shows up on Ripple's Validator Registry.
{"key_type" : "ed25519",
"public_key" : "nHBikG2wB8jNs1y1eXA9jHGDygLd9isXDY9pUGYWdaBFWcnRdTNZ",
"revoked" : false,
"secret_key" : "panbJ5Uxf8WbPk9zvcxLG3nasX8whnp6YMFxgsiwR4bXaUcMGCC",
"token_sequence" : 0
}
Use rsync through SSH, scp, or similar to backup your "validator-keys.json" file. Keep this file private at all costs, or someone could use it to impersonate your validator.
Generating A Validator Token
As an extra level of security, we will generate a token, so that we do not need to keep our "validator-keys.json" file on our server. However, we will associate a domain with our validator, so that others can verify our validator's identity. This verification process is important, as validators votes and proposed ledger versions only matter if others nodes include the validator in their UNL. Taking credit for a validator through domain verification is an important part of the trust building process that is involved with being added to other nodes' UNLs. We can add our domain to our "validator-keys.json" file using the validator-keys tool:
/opt/ripple/bin/validator-keys set_domain your-domain.com
You might need to include the "--keyfile" flag in the above command, if you saved your "validator-keys.jason" outside of "/root/.ripple/". The command will output two important pieces of information: (1) your validator_token, which must be included in your rippled.cfg file and (2) an attestation, which should be added to the xrp-ledger.toml file.
If you have already run the above "set_domain" command, the tool will output an error message to that effect. If you need to generate a new validation token without changing your domain, you can run:
			/opt/ripple/bin/validator-keys create_token --keyfile
			~/.ripple/validator-keys.json
Replace "~/.ripple/validator-keys.json" with the path to the validator keys you generated using the "create_keys" command. The validator_token output from either the set_domain or create_token command will look similar to this:
[validator_token]eyJtYW5pZmVzdCI6IkpBQUFBQUZ4SWUxQ2pPV3Z3WldzSjVmNGJ4R3FYa0JXVS9GQzRrOEY0
U3RsTVVyUU81UkF0M01oQWdaenBKK2dNSTRkbk02N0pJMUZ2T0d0bnZpZEQxVmUxL21lMnA1
akgwcnVka2N3UlFJaEFJY0VzRXFSOWJFd2Y4NtdxUHFIbjgyVzJiIHB4cTF2TjFWTUE2QmJK
a0NiQWlBVWp3N2lhYXdQZmZmb0RGdmxmeFJ4bUtNM3pDaWZieUpZZFAxRLlmTVUxbkFTUUJ1
UnNKb3RIZ2l4OU5QUUgyNmd5TDdsTXRESEQyK0kyMncvSVZNTlYwQ8VHVvtKL08zTDRjOUd3
ZU91TlRsbUN4M2NodS83UDFVNWFIU3VSVWRCK0FBPSIsInZhbGlkYXRpb25fc2VjcmV0X2tl
eSI6IkI2REY0ODI4Q0U4REU3Qzg2MEVDMDlBNDVCMkEyRDY4NkZBQzM5NkNBMEU5QUM1QTQ2
NTY0RENE4EQzQzk00TBifQ==
After you have backed up your "validator-keys.json" file and pasted the "[validator_token]" into your rippled.cfg, you can delete the "validator-keys.json" file from your server:
rm ~/.ripple/validator-keys.json
Make sure to change the "~/.ripple/validator-keys.json" in the above command based on where your file is stored. Also, note that any command that generates a new validator_token (i.e., the create_token or set_domain commands) will increment the sequence number in the "validator-keys.json" file by one. If you keep a master validator-keys file offline, it is important to ensure that you update the sequence number after creating a new token, since other rippled servers will ignore validations from servers with a sequence number that is lower than the highest observed sequence.
Edit rippled.cfg
Add the validation token to your rippled.cfg file:
sudo nano /etc/opt/ripple/rippled.cfg
Simply paste the output from the command into the rippled.cfg file. While we are editing the rippled.cfg file, we will also modify the file so that our validator only connects to the non-validating node in our cluster.
Peer Private
Enabling "[peer_private]" tells the nodes that our validator connects to that we do not want them to forward our validator's IP address to the network. Even if your validator is not clustered, you can use peer_private to specify which nodes in the network you would like it to connect to. If you enable peer_private, you will need to specify other nodes' IP addresses under the "ips_fixed" section.
We can use the "[peer_private]" setting to tell our non-validating node not to pass our validating node's IP address on to the rest of the network. To do so, we will also need to edit the "[ips]" section of the rippled.cfg file. Assuming our validator is assigned the IP address "10.0.0.1" on our LAN, and our non-validating node is assigned the IP address "10.0.0.2", our validating node's rippled.cfg file will be altered accordingly:
- For efficiency and security reasons, validating nodes should not
allow incoming peer protocol connections. Remove or
comment any connections in the server section of your rippled.cfg that
have "protocol = peer":
[server]
#port_peer
#[port_peer]
#ip = 10.0.0.1
#port = 51235
#protocol = peer - The non-validating node's IP address and rippled port will be added under the "[ips]"
and "[ips_fixed]" sections. Delete "r.ripple.com" and any addresses
that point to servers other than stock nodes under your control. Only
including IP addresses you control under "[ips]" and enabling
"[peer_private] prevents your
validators' IP from being disclosed to others:
[ips]
10.0.0.2
					51235

[ips_fixed]
10.0.0.2 51235 - We will enable "[peer_private]" by setting it to
"1":
[peer_private]
1
Restart rippled to enable validation:
sudo systemctl restart rippled
Ensure rippled is started without errors:
sudo systemctl status rippled
Make sure that your validator is connected to the non-validating node:
/opt/ripple/bin/rippled server_info
If you are connected, the output from the command will show:
"peers" : 1If your validating node does not show that it is connected to any peers (i.e., "peers : 0"), it is most likely due to a firewall misconfiguration. Ensure that the LAN connections on both nodes allow inbound and outbound traffic on port 51235 TCP.
After a few minutes of syncing with the network, the "server_info" command will show that your validator is proposing transactions to the network:
"server_state" : "proposing"Trusting the Validating Node
Skip this section if you are not running your validator in a cluster with other nodes.
In order for our non-validating node to pass XRP ledgers that are proposed by our validating node on to the rest of the network, we need to tell our non-validating node to trust our validator's signature. We will do this by editing the "[validators]" configuration on the non-validating node:
sudo nano /etc/opt/ripple/validators.txt
This file stores the list of public validators that our rippled node trusts. We will add the public key that was in our "validator-keys.json" file. Paste the public key under the "[validators]" heading at the bottom of the file:
[validators]nHBikG2wB8jNs1y1eXA9jHGDygLd9isXDY9pUGYWdaBFWcnRdTNZ
[validator_list_sites]
https://vl.ripple.com
[validator_list_keys]
ED2677ABFFD1B33AC6FBC3062B71F1E8397C1505E1C42C64D11AD1B28FF73F4734
Notice that the first entry under the "[validators]" section in the above code block is the same as the public validator key we generated that was saved in the validator-keys.json file.
Validator operators should ensure that their "[validators]" list contains only the public keys for the validators that Ripple runs. As Ripple decentralizes the network, validator operators can begin to replace the public keys from the ripple.com validators with other validators that they trust. Your "[validators]" list for the validating and non-validating nodes should be identical, except that the list on the non-validating node also contains the public validation key for the validating node.
Viewing the Nodes on Ripple Charts
Ripple provides two websites that are useful for node operators, the Validator Registry and the Network Topology webpages.
Ripple's Validator Registry
We can check that our validating node shows up on Ripple's Validator Registry. The "pubkey_validator" value from the "server_info" command is how our validator will be identified in the Validator Registry. You may need to wait 15 or more minutes for the Validator Registry to update.

Click on the image above to enlarge. Note that the validator's public key is the same key that we have in our validator-keys.json file. This screenshot also shows the official RabbitKick.Club validator.
bithomp.com/validators also lists XRP validators.
Network Topology
You can also check the status of all your ripple nodes on the Ripple Network Topology webpage. This webpage will identify your nodes using the "pubkey_node" value that is returned from the "server_info" command.

In the above screenshot (click to enlarge), notice that the validator's IP address is missing (due to enabling "peer_private"), and the validating node is only connected to one peer (the non-validating node). The connection between the validating and non-validating nodes may be incoming or outgoing, depending on which node initiates the connection.
This can be contrasted with the following screenshot from our non-validating node, which shows its IP address. Note that the public node also has 11 inbound and 11 outbound connections:

One of those connections is to our ripple validator. The other 21 connections are to other nodes on the ripple network.
Backing Up & Relocating rippled
Like any other server, it is important that rippled node operators take time to back up important files. While a comprehensive backup plan likely includes files that are used by the operating system and other services (e.g., iptables, vpn configuration files, network settings, etc.), I will not discuss backing up files unrelated to rippled in this section.
Both backups and relocations involve removing potentially sensitive data, like your validation token, from your server. It is important that you use a secure means to transfer these files from your rippled server to your backup location or new server. I often use rsync through ssh or scp, though other means exist. Note that some solutions, like FTP, can have serious vulnerabilities, like not encrypting your data during transit. Running a FTP server on a rippled node opens an additional attack vector, while rsync and scp use ssh.
Back Ups
There are many potential files and databases associated with rippled that one might want to back up (e.g., log files, history shards, etc.). For the purpose of this introductory tutorial, I will focus on backing up two essential rippled configuration files, as well as the wallet.db database. It is possible to customize the locations for the UNL settings as well as the wallet.db location. The 'rippled.cfg' file contains the paths to both locations ('[validators_file]' and '[database_path]').
These files and their locations are:
- The main rippled.cfg file
/etc/opt/ripple/rippled.cfg
- The UNL configuration file
/etc/opt/ripple/validators.txt
- The wallet.db file, which stores the keys used to identify the
server. These keys are generated the first time that rippled starts,
however, they can be moved to a new server if one wishes to maintain a
consistent identity. These keys are not the same as the validation
key.
/var/lib/rippled/db/wallet.db
Relocating
When moving a node to a new server, simply copy the three files identified in the previous "Back Ups" section to the new server ('rippled.cfg', 'validators.txt', and 'wallet.db'). When copying files, ensure the permissions are correct and that the selinux contexts (if applicable) are correct.
Relocating validating nodes typically requires additional consideration, as properly configured validators only connect to known peers. Thus, if a validator's IP address changes, then the validator operator needs to ensure that the new IP address is added to the "[ips_fixed]" section on the stock nodes that the validator connects to. In other words, you must reconfigure (and restart) the other nodes in your cluster that provide connectivity to the validating node. This process is often fairly complex and requires thorough planning for validators that rely on high availability stock nodes (i.e., large hubs, nodes that provide websocket access, etc.) for connectivity.