rabbit's Guide to Installing & Securing CentOS 7 on Servers
This guide is designed for anyone who is running a Linux based server, however, examples in the guide are generally tailored to CentOS 7. This guide is not comprehensive, however, it will hopefully be enough so that you aren't low hanging fruit. We are in no way responsible for your security, and by using this guide, you agree not to hold us liable for your security.
Table of Contents
Choosing a Server Location
Choosing the right home for your server is an important consideration, and different locations have divergent risks and benefits.
Benefits of Home Servers
- Physical control over access to the server. This is an important security consideration.
- Price - you don't have to pay a monthly fee, although you may have an upfront cost for hardware.
- Freedom to install whatever operating system you want.
Drawbacks of Home Servers
- Typically homes do not have redundant power and internet - your electricity or internet going out for a few hours could result in a massive dent in your agreement score.
- Dynamic IP address. It is challenging for the outside world to connect to a server, if the server's address is always changing. This limitation can be overcome by using a remote VPN server or a remote gateway that forwards traffic to your home server. Also, the dynamic IP address you were just assigned could have belonged to anyone, and thus could be a target for malicious activity. Some ISPs allocate static IP addresses, often for an additional fee.
- Slower connection, particularly upstream.
Benefits of Professional Hosting Companies
- Professional hosting companies provide users with high speed connections and static IP addresses.
- Increased uptime and server availability.
Drawbacks of Professional Hosting Companies
- Some hosting companies limit what operating systems a user can install, and some may limit users from using whole disk encryption.
- Users don't know who has access to their server.
- Virtual private servers (VPS) can dynamically allocate resources. The memory your server was just using could be assigned to a different person, which could result in a memory leak.
Passwords
Secure passwords are important, however, few users take the time to use strong passwords that are stored in an encrypted file or drive. Tools such as the Only Key by Crypto Trust can be useful for password management. To generate a secure password in linux, you can use apg (Automatic Password Generator) by typing the following command into a terminal prompt:
apg -ck -m 20 -n 1 -M CLN -E IlOo0
In the above code snippet:
- "apg" calls the program.
- The "-c" option is used to create a seed without user input. It can be replaced with "s", which prompts the user for keyboard input to use as a seed to generate the password.
- The "k" option checks the generated password against known lists using cracklib (you must have cracklib installed for this to work).
- The "-m 20" tells the program that the password must be a minimum of 30 characters long. You can change this number to suit your needs. Secure passwords should be a minimum of 14 characters long.
- The "-n 1" specifies that we only want one password to be generated.
- "-M CLN" indicates that the password must include capital letters (C), lowercase letters (L), and numbers (N). It is ideal to also include symbols. When typing randomly generated passwords, be mindful of confusing characters that can look alike, including "I" (capital "i"), "l" (lowercase "L"), and the number "1".
- "-E IlOo0" tells apg to exclude (E) symbols that may be difficult to distinguish from one another, as look alike symbols can result in passwords being entered inaccurately.
If you are copying/pasting passwords, make sure your password isn't saved in the clipboard.
Changing Passwords
Some hosting providers assign passwords to user/administrative accounts. If this is the case, it is imperative that you immediately set a new password. You can change your password using the 'passwd' command:
passwd rabbit
Replace "rabbit" in the above code snippet with your username. Superusers (sudo/root) can change the password for any user account, while non-administrative users can only change their own password.
Disk Encryption
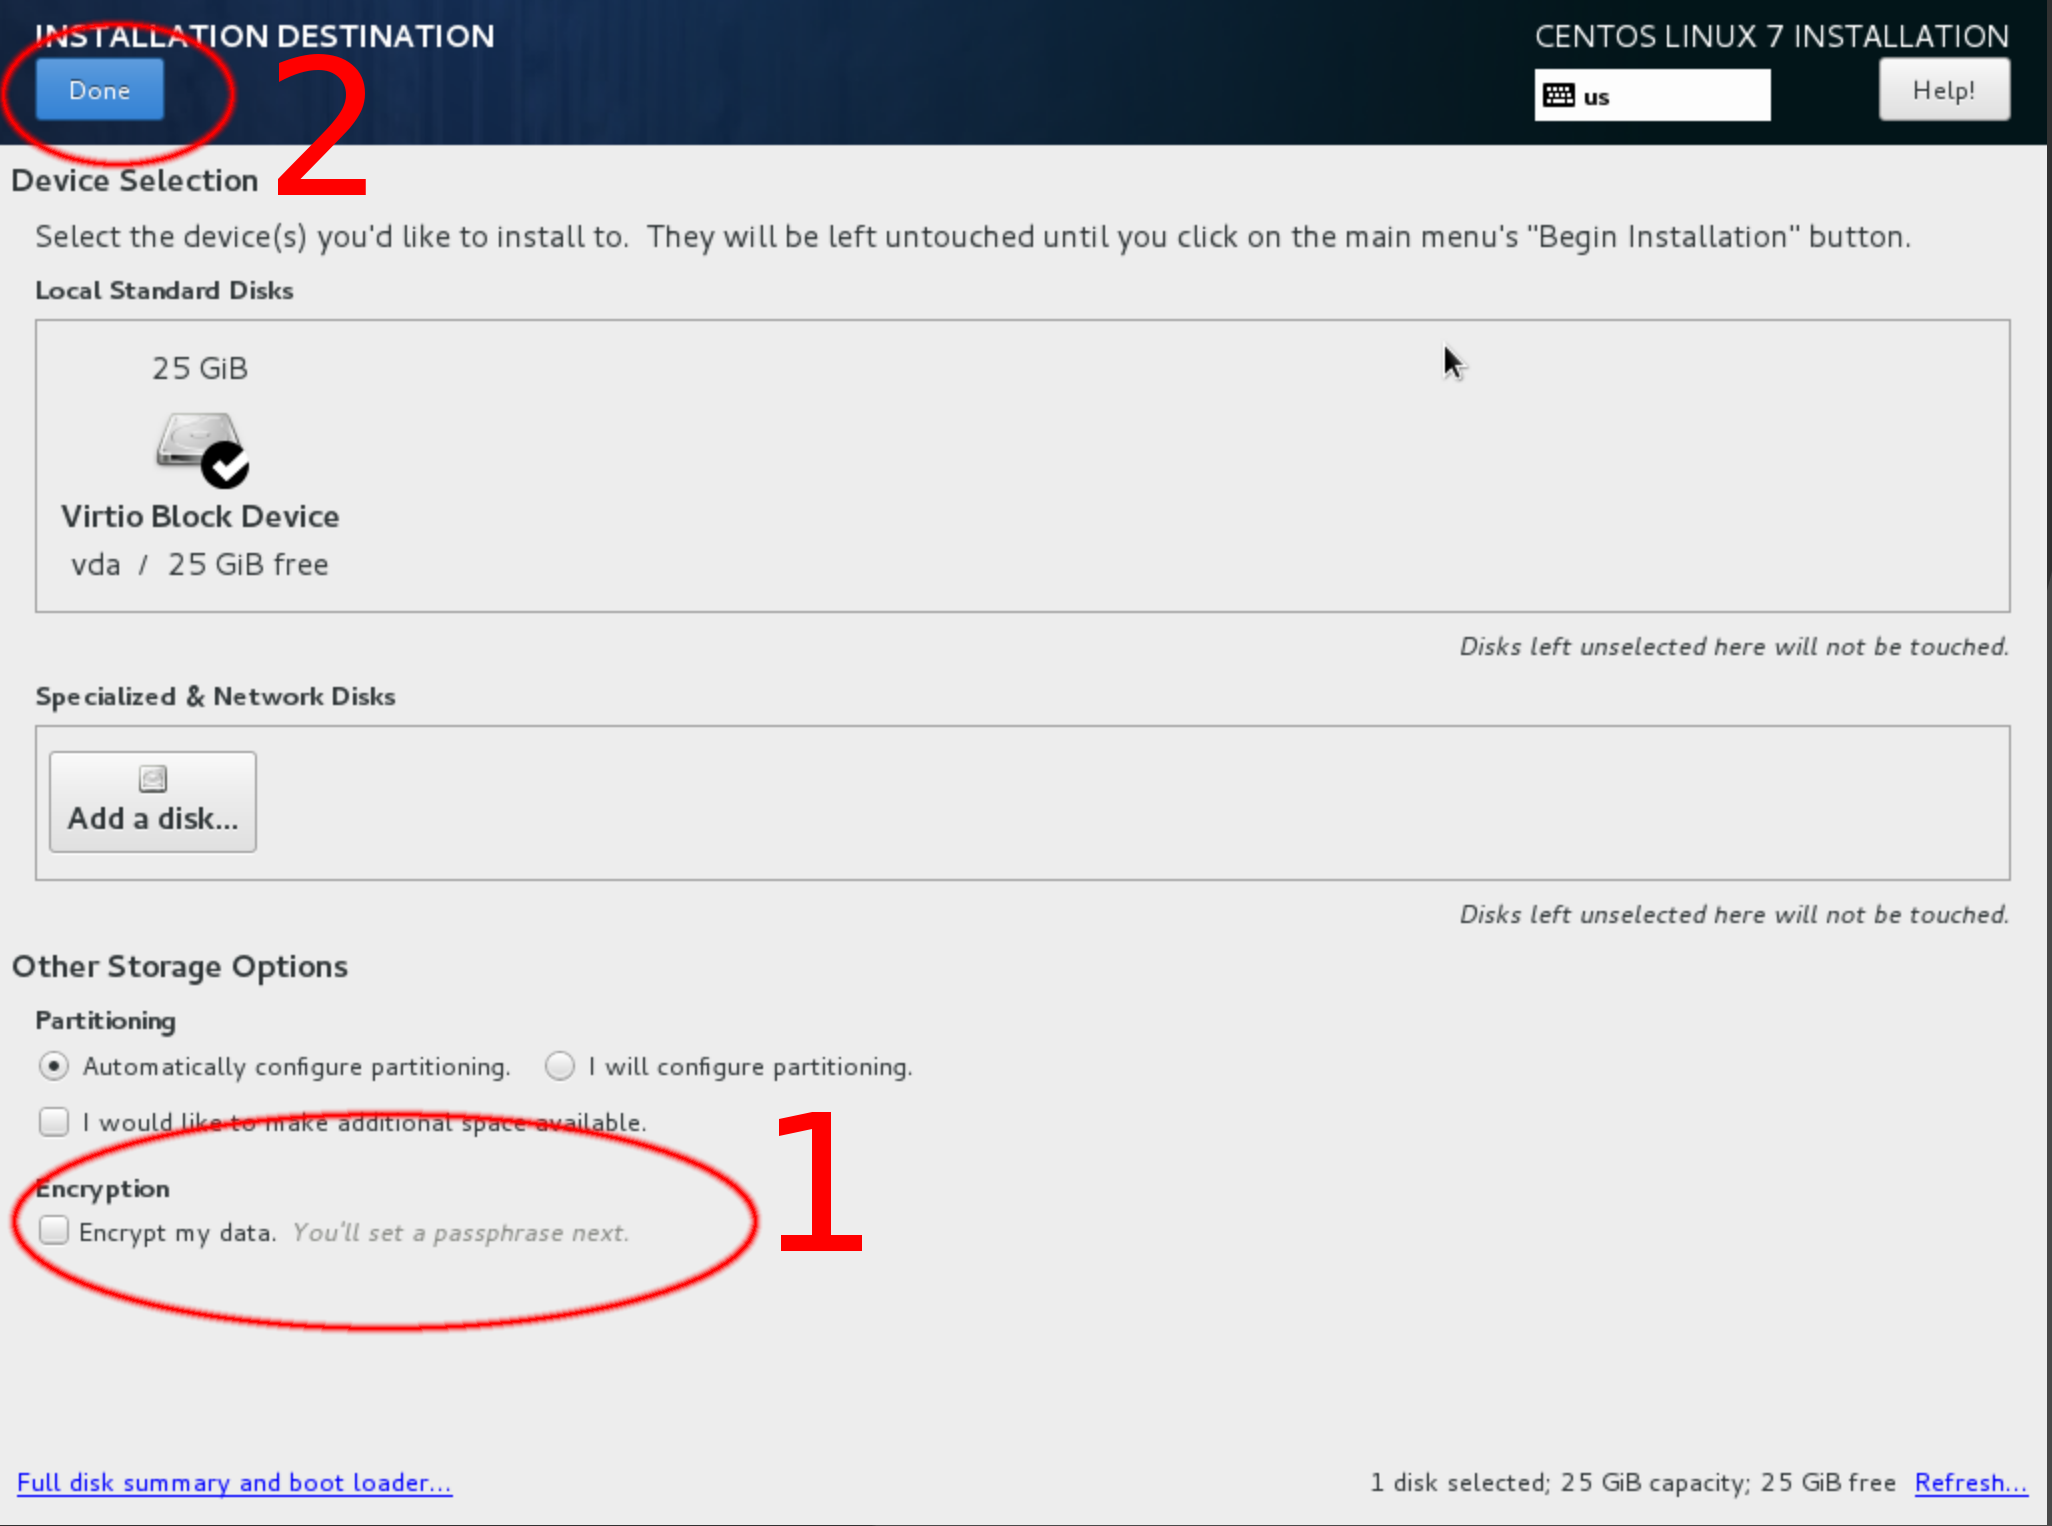
Whole disk encryption is an important security measure, as it protects your data that is at rest (i.e., not moving through a network) from being accessed or modified. Enable disk encryption when you are installing the operating system. Note that disk encryption will not protect your server from someone modifying the processes that are responsible for booting your server.
- On the "Installation Destination" screen, check the "Encrypt my data" box.
- Click "Done".
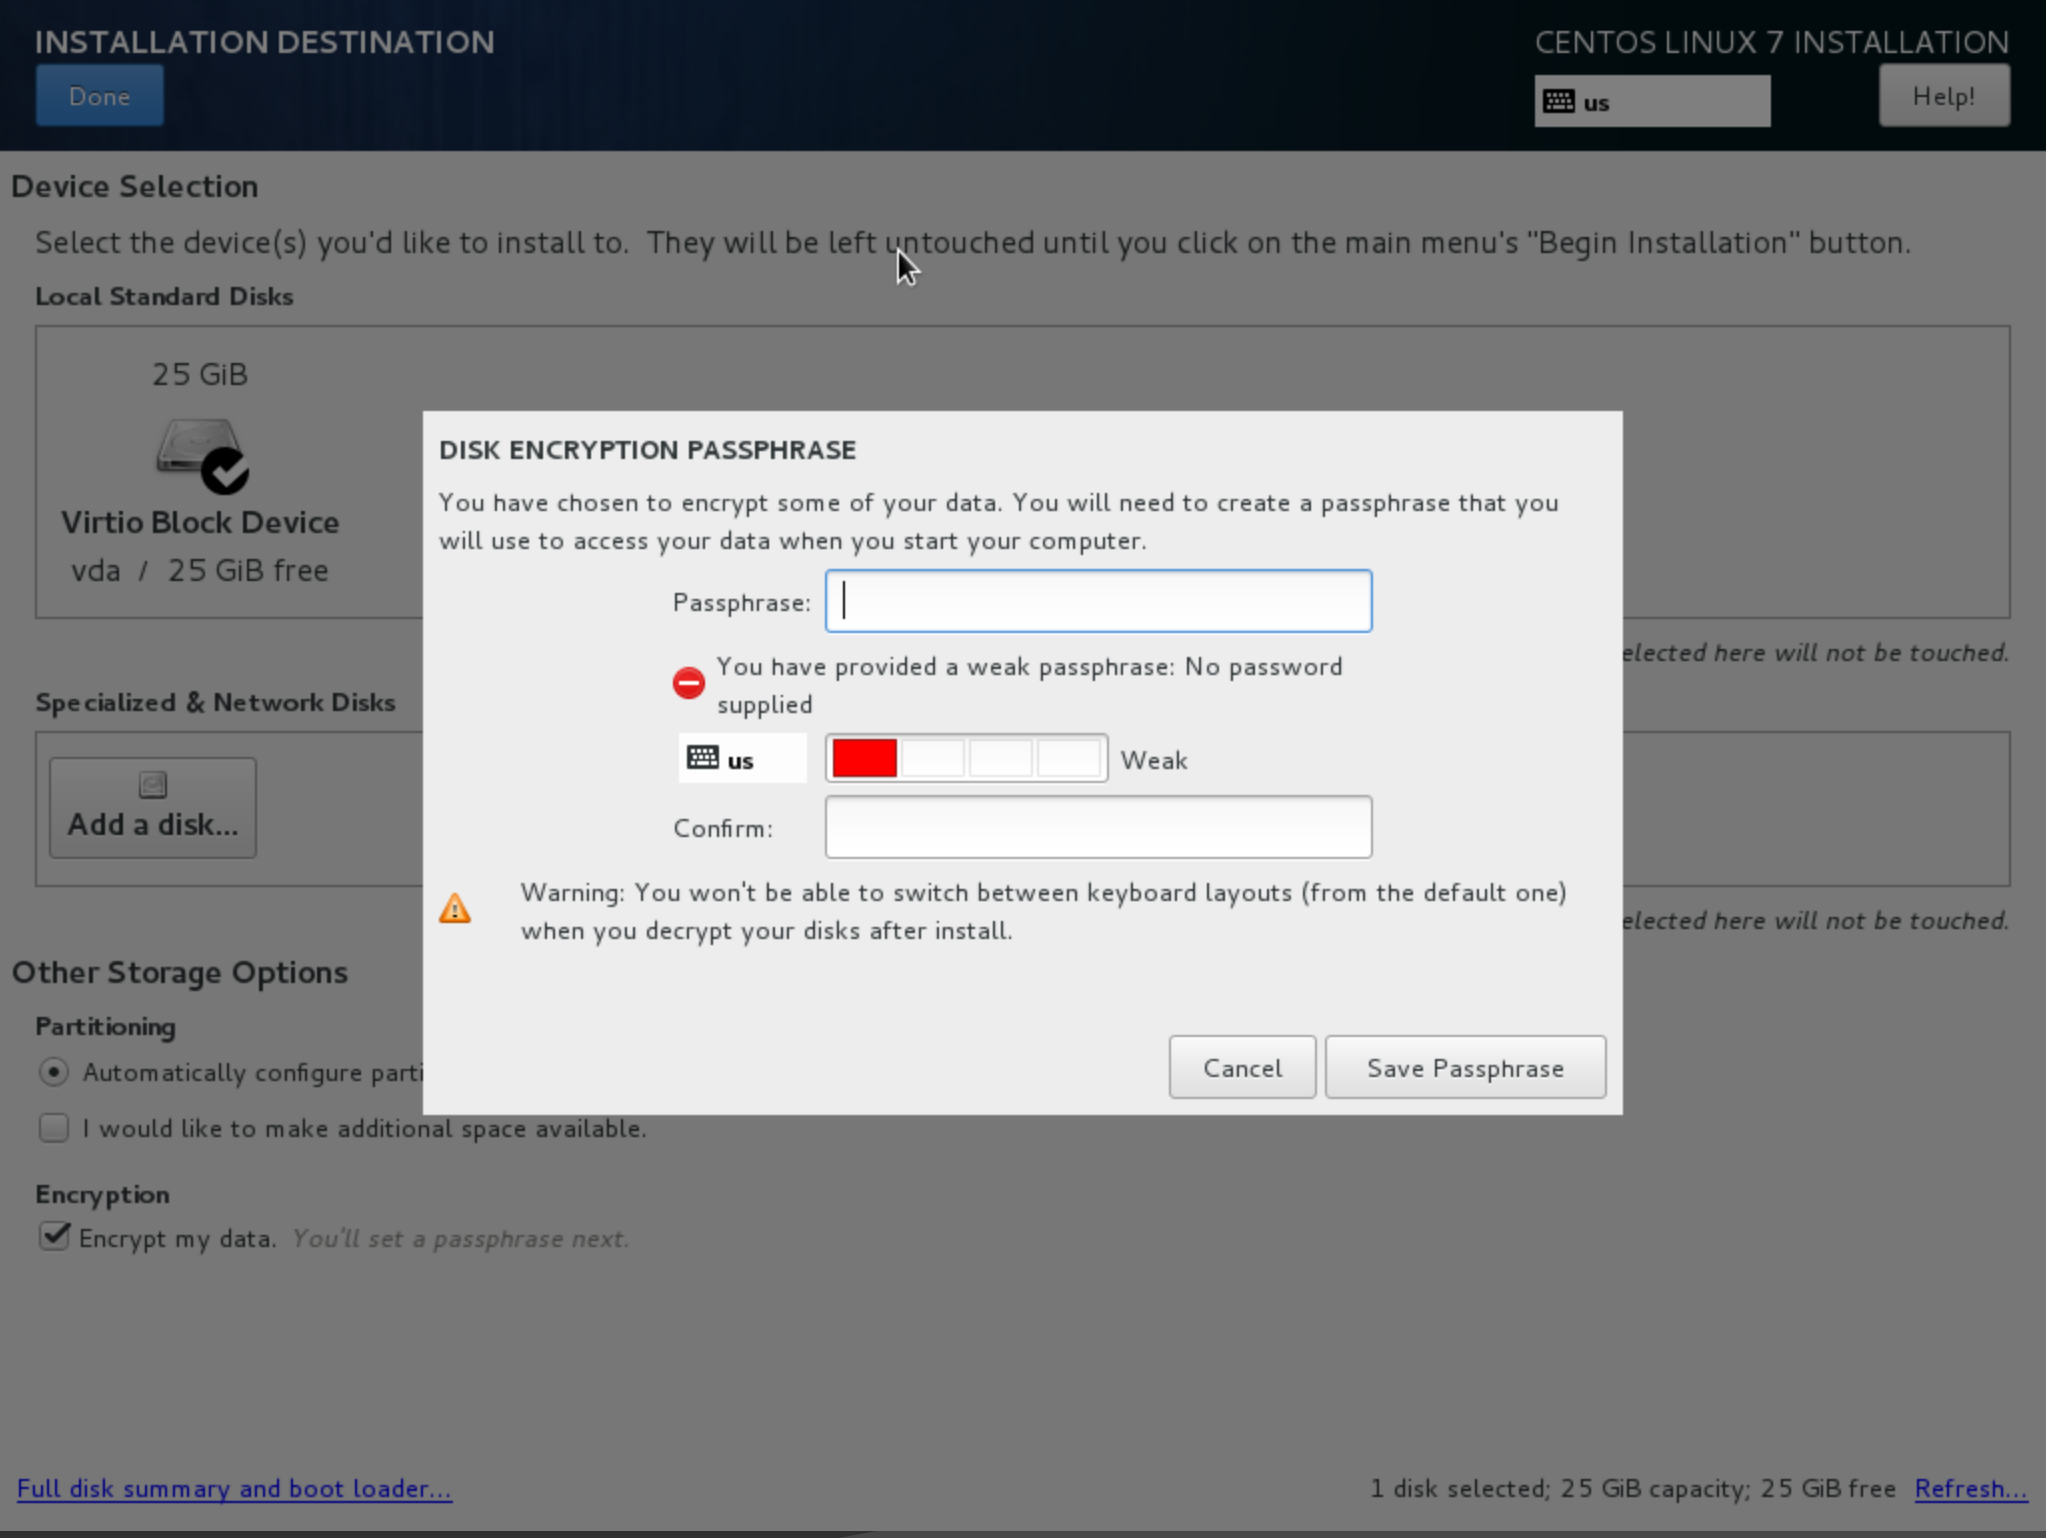
- Enter and verify your password when prompted. Remember your password, as you won't be able to start your computer or access your data without it.
- Every time your computer boots, you will need to access a serial console, usually in your hosting provider's dashboard, so that you can type your password. ssh will not work until you have unlocked your disks.
Note: After installing the operating system, you will likely need to eject the installation disk (iso) image so you can boot from the new install. The steps for this vary by hosting provider.
Root Access
On *nix systems, the root user has complete access to every file or process on a given system. Anyone with root access has complete control of the system. Sometimes root access is needed to change files or settings, or even to browse some directories. Instead of logging in as the 'root' user, consider disabling the root account entirely, as the 'sudo' command can be used to complete a task as though you were root. If you do not set a password for the root account when you are installing the OS, the root account will be disabled. Instead, simply create a new user, and check the box to give the user administrative privileges. For example, if you have the root account disabled, and you need to restart the ssh process, you could use:
sudo systemctl restart sshd
This will allow you to execute the systemctl command as though you were a root user. If you are engaging in several tasks that require root access, simply enter:
sudo -i
This will allow you to execute commands as though you were root, without prefacing them with sudo. For example, if you had entered "sudo -i", you could run:
systemctl restart sshd
And the command would be run as though you were root, even though you didn't preface it with "sudo".
In this guide, I preface commands that must be run as an administrator with "sudo". If you used "sudo -i", than omit the word "sudo" when running these commands.
Installing Updates
Don't forget to update your server regularly by running:
sudo yum upgrade
You may need to restart your server to fully apply updates. Always restart after updating the Linux kernel.
Basic Software
Installing some additional software can make your life much easier. In this example, I will use nano for my text editor. I also like to use rsync through ssh to transfer files and tmux to manage terminal windows. I also typically install the epel-release repository, which provides access to additional software packages. Finally, ntp is useful for keeping your server's clock accurate. The examples in this guide use nano, however, you are free to use whatever text editor you prefer (e.g., nano, vi, etc.).
You can install them by running:
sudo yum install rsync wget ntp tmux curl epel-release
I like to use htop to monitor performance. htop is included in the epel-release repository. After you have installed "epel-release":
				sudo yum upgrade
				sudo yum install htop
I prefer vim to nano, and I customize vim using the "~/.vim" file. A sample vim configuration file is available in my git. If you want to use my configuration file, run:
				wget -O ~/.vimrc
				https://raw.githubusercontent.com/crypticrabbit/server_configs/master/.vimrc

				wget -O ~/.tmux.conf https://raw.githubusercontent.com/crypticrabbit/server_configs/master/.tmux.conf
This command will fetch my .vimrc file from my git and will automatically save it to the home directory associated with the user that you logged in as. You can use "~/" as a shortcut for the full "/home/username/" file path to your home directory.
- wget is a software package that fetches files using HTTP.
- "-O ~/.vimrc" tells wget to save the file in your home directory (~/) as ".vimrc".
- "https://raw.githubusercontent.com..." is the URL where my .vimrc file is hosted.
I use the following software to monitor servers:
- nmap
- Used to scan for open ports 'nmap -Pn address -p port'
- iptraf
- Real time network traffic monitor that provides summery data or detailed information on each connection.
- vnstat
- Retrieves network usage data from the kernel, and logs it in a database, so you can easily monitor bandwidth use.
- speedtest-cli
- Tests internet connection speed. I generally don't use this on servers, as they live in data centers with high speed connections, but it is great for my laptop!
- mtr (My Trace Route)
- More advanced traceroute program that is terrific for troubleshooting intermittent network issues.
- traceroute
- Similar to mtr, but does not continuously send packets.
- bind-utils
- Useful for things like querying DNS records using dig
Firewall/iptables
You can download a template with some default rules for IP tables here:
wget -O ~/iptables.sh https://raw.githubusercontent.com/crypticrabbit/server_configs/master/iptables.sh
After downloading the iptables, make sure to change variables to match your server. If you don't know your server's IP addresses and interface names, run:
ip addr
Once you know your interface names and IP addresses, edit the variables at the top of the iptables.sh file:
nano ~/iptables.sh
When you are ready, initialize your IPtables rules:
sudo bash ~/iptables.sh
If you don't see any error messages, your rules were successfully initialized. You could build on the basic rules in the iptables.sh template by adding advanced features, such as port knocking and logging.
Persistant iptables Rules
Note that, by default, iptables rules do not persist across server restarts. Thus, you need run a bash script with your rules every time you start your server. Alternately, you can tweak some system settings. I have had intermittent success getting iptables rules to persist across restarts. For persistent iptables rules, edit:
sudo nano /etc/sysconfig/iptables-config
Ensure the following values are set in the iptables-config file:
				IPTABLES_SAVE_ON_RESTART="yes"

				IPTABLES_SAVE_ON_STOP="yes"
If you also have IPv6 rules in your iptables, you will also need to set the above values in the ip6tables config file:
sudo nano /etc/sysconfig/ip6tables-config
Logging Dropped Connections
For diagnostic and security purposes, it is often desirable to log connections that are dropped by iptables. The iptables script I provide contains rules that will log all dropped incoming and outgoing connections. By default (on RHEL/CentOS), dropped packets are logged to '/var/log/messages'. I find it more convenient to have a dedicated log file for iptables. To change the iptables log file location, edit or create:
sudo nano /etc/rsyslog.d/iptables.conf
As this uses regex to detect log messages that begin with "iptables: ", it is important that you set:
--log-prefix "iptables: "
in your iptables rules. Add the following lines to iptables.conf:
				:msg, startswith, "iptables: " -/var/log/iptables.log

				& stop

				:msg, regex, "^\[ *[0-9]*\.[0-9]*\] iptables: "
				-/var/log/iptables.log

				& stop
This will change the logfile location to "/var/log/iptables.log"
You will likely want to use logrotate to manage your log file, so you don't end up with a massive log. To do this, ensure that you have logrotate installed:
sudo yum update && sudo yum install logrotateOnce logrotate is installed, you will need to make a configuration file for your iptables log:
nano /etc/logrotate.d/iptables.confEdit the file, so it contains the following:
				/var/log/iptables.log {

			      weekly

				    rotate 5

				    size 25M

				    compress

				    delaycompress

				    create 600 root root

				}
In the above configuration:
- "/var/log/iptables.log" tells logrotate the path to the logfile it will be rotating.
- "weekly" says that the log should be rotated every week.
- "rotate 5" will save the last five rotated log files, then delete any log files older than that.
- "size 25M" tells logrotate that we only want to rotate the log if it is at least 25 megabytes in size. Combined with "weekly", this means logrotate will attempt to rotate the logfile once per week, but it will skip rotation if the file is less than 25 MB.
- "compress" is used to compress rotated (old) logfiles.
- "delaycompress" is used so logrotate won't compress the most recent rotated file (this makes it slightly more convenient to review the file.
- "create 600 root root" will create a new logfile after rotation, and the log file will be read/writable by root (600) tells logrotate that we only want to rotate the log if it is at least 25 megabytes in size. Combined with "weekly", this means logrotate will checkattempt to rotate the logfile once per week, but it will skip rotation if the file is less than 25 MB.
- "compress" is used to compress rotated (old) logfiles.
- "delaycompress" is used so logrotate won't compress the most recent rotated file (this makes it slightly more convenient to review the file.
- "create 600 root root" will create a new logfile after rotation, and the log file will be read/writable by it's owner only (600) and it will be owned by the root user and root group.
Securing ssh
If you are installing rippled on a computer that you have physical access too (for example, a desktop computer in your living room), they you probably won't use SSH to interact with the computer, since you can just plug in a monitor, keyboard, and mouse.
SSH (Secure SHell) is an application for interacting with a remote computer. By default, ssh listens for TCP packets sent to port 22. The most secure way to access ssh is using public/private ssh key pairs. Keys are saved in a user's ".ssh" directory. To generate a new keypair:
				cd ~/.ssh/

				ssh-keygen -t rsa -b 4096 -C "your@emailaddress.com"
This will generate two 4096 bit RSA keys. The key that ends in ".pub" is public, and can be shared with anyone. Do not share your private key with anyone. Also, ensure you backup your keys to a secure location, like an encrypted USB drive. You will need to copy your public key file to "~/.ssh/authorized_keys" on your server, so that ssh can verify your identity when you login using your private key.
Sending Your Public Key To A Server
If you need to transfer your public key from your personal computer to your server, you can use:
				rsync -vz -e ssh ~/.ssh/id_rsa.pub
				username@server.ip.add.ress:/home/username/.ssh/authorized_keys
This command will overwrite the "authorized_keys" file on your server.
- rsync is a program for copying files from one computer to another.
- "-vz" tells rsync to use verbose ("v") mode, which outputs additional text/warnings and to also use compression ("z").
- "-e ssh" tells rsync that you want to use ssh to connect to the remote server. Without ssh, rsync sends data to the server unencrypted, which means anyone could intercept it.
- "~/.ssh/id_rsa.pub" is the path to your public ssh key on your local computer. You may need to change this.
- "username@server...:/home/username/.ssh/" is the path to your "authorized_keys" file on the remote server. Change "username" to your username on the remote machine, and change "ip.add.ress" to the remoter server's ip address. Change "username" in the "/home/username/.ssh/..." file address to your username on the remote server.
Logging in Using Your Public Key
Login to your remote server using your ssh key:
ssh -i ~/.ssh/id_rsa username@serveraddress
Replace "id_rsa" with your private key file, change "username" to your username on the server you are trying to access, and change "serveraddress" to the server's IP address.
If you are using linux on your local computer (e.g., laptop), you can use ssh-add to store the password that is used to decrypt your private ssh key:
ssh-add ~/.ssh/id_rsa
Change "~/.ssh/id_rsa" to point to your private ssh key. When prompted, you will have to enter the password to decrypt your key.
If you are asked for a password, something went wrong. Check that your "~/.ssh/authorized_keys" file is in the home directory associated with your username, and that you have set appropriate ownership and file permissions. If you continue to have issues, you may need to check the SELinux policy associated with the file. If you suspect a problem with ownership, permissions, or SELinux, you can run these commands:
chown -R username:username /home/username/.ssh
chmod 700
				/home/username/.ssh && chmod 644
				/home/username/.ssh/authorized_keys
restorecon -R /home/username/.ssh
Make sure to replace "username" in the above commands with your username.
- chown is used to change the ownership of a file. The -R option is used to change ownership recursively, so that it is changed for all of the files inside the ".ssh" directory.
- chmod is used to change permissions. The "700" tells chmod that the owner of the "~/.ssh" directory (your username) should be able to read, write,and execute (display the contents of) the ".ssh" directory, while members of your user's group and the public should not be able to read, write, or execute the directory or file. The "&&" in the command tells the server to only execute the second command if the first completes successfully. "644" in the second command sets the "authorized_keys" file's permissions so that it can be read and written to by the owner (your username) and read by your username's group as well as the public.
- restorecon is used to reset the SELinux security context of a given file or directory. Again, the -R option is used, so that it restores the context for both the ".ssh" directory as well as the files contained in the directory.
Strengthening SSH Security
You can strengthen the default ssh security by using a text editor to modify the configuration file:
sudo nano /etc/ssh/sshd_config
Ensure the following parameters are set in your configuration file:
				PasswordAuthentication no

				PermitRootLogin no

				AllowUsers rabbit

				Protocol 2

				Port 22

				ListenAddress 10.00.00.00

				ListenAddress fdb9::111

				IgnoreRhosts yes

				ChallengeResponseAuthentication no

				GSSAPIAuthentication no

				X11Forwarding no

				ClientAliveInterval 600

				LoginGraceTime 2m

				PrintLastLog yes

				Compression no

				UsePrivilegeSeparation sandbox

				StrictModes yes

				Banner /etc/issue
- "PasswordAuthentication no" prohibits users from using passwords to login to ssh. Users should use ssh keys rather than passwords.
- "PermitRootLogin no" bars anyone from logging in through ssh as the root user. Use "sudo -i" instead of logging in as root.
- "AllowUsers rabbit" specifies the usernames who are allowed to login to the server. Change "rabbit" to your username.
- "Protocol 2" specifies that the second version of the ssh protocol should be used. Version 1 is not secure. Only use version 2.
- "ListenAddress" tells ssh which ip address(es) to listen on. I run VPNs on all of my servers, and I prefer ssh to only listen for connections coming through my VPN. You can specify multiple IPv4 and IPv6 addresses.
- "IgnoreRhosts yes" ignores insecure rhosts files.
- "ChallengeResponseAuthentication no" and "GSSAPIAutentication no" disables challenge response and GSSAPI authentication.
- Secure servers do not have a graphic user interface (GUI) installed, so you can set "X11Forwarding no", since there is no display to forward.
- "ClientAliveInterval 600" tells ssh to automatically log out users who are inactive for more than 600 seconds.
- "LoginGraceTime 2m" tells ssh to drop connections if a user hasn't logged in within two minutes.
- "PrintLastLog yes" will print the last time someone logged in via SSH.
- "Compression no" disables compression over SSH, as there are some vulnerabilities associated with it.
- "UserPrivilegeSeparation sandbox" tells SSH to use unprivileged processes to handle incoming connections, which prevents unauthorized privilege escalation.
- "StrictModes yes" tells ssh to check files for the correct permissions before allowing users to log in.
- "Banner /etc/issue" tells ssh to print the message saved in '/etc/issue' when a user attempts to login. You can change the message by editing '/etc/issue'.
Restarting ssh
After you modify the ssh configuration file, restart the sshd service, so your changes take effect:
sudo systemctl restart sshd
Port Knocking
Attackers looking for open ports are likely to scan port 22, as it is the default ssh port. For additional security, you can use port knocking, so that port 22 appears closed to anyone scanning your server. Port knocking involves attempting to connect to a series of closed ports. Once you have unsuccessfully attempted to connect to the right series of closed ports, then the server will allow incoming connections to port 22 from your IP address.
This Server Fault answer includes an example of port knocking in iptables.
Copying Files To & From Servers
rsync
Only use rsync through SSH
rsync -vzd -e ssh ~/file.to.copy
					user@ip.add.re.ss:/home/username/
- Add info on --delete
- Add info on file/ownership permissions
scp
Additional Software = Larger Attack Vector
- Don't run anything on your rippled nodes that isn't necessary.
- Consider using a minimal or headless (no GUI) operating system install.
Miscellaneous
System Messages via Email
I find it is convenient to receive system mail in my personal email inbox. Do not use a rippled server as a fully functioning mail server (IMAP, POP, spamd, etc.). Start setting up system mail forwarding by installing postfix:
sudo yum install postfix
Once you have installed Postfix, you will need to generate a SSL/TLS certificate and edit the configuration file, so your messages are encrypted while in transit. To generate a SSL/TLS certificate, run:
				sudo mkdir /etc/ssl/postfix

				openssl req -x509 -sha256 -nodes -days 3650 -newkey rsa:4096 -keyout
				/etc/ssl/postfix/postfix.key -out /etc/ssl/postfix/postfix.crt

				chown -R root:postfix /etc/ssl/postfix

				chmod 440 /etc/ssl/postfix/*

				chmod 750 /etc/ssl/postfix
Enable SSL/TLS in postfix by editing:
sudo nano /etc/postfix/main.cf
Append the following settings to main.cf:
				smtpd_tls_cert_file = /etc/ssl/postfix/postfix.crt

				smtpd_tls_key_file = /etc/ssl/postfix/postfix.key

				smtpd_tls_security_level = encrypt

				smtp_tls_security_level = encrypt

				smtpd_tls_auth_only = yes

				smtpd_tls_received_header = yes
Start postfix, ensure it is running, and enable it:
				sudo systemctl start postfix

				sudo systemctl status postfix

				sudo systemctl enable postfix
If postfix is already running, you will need to issue:
sudo systemctl restart postfix
so postfix loads the modified configuration file.
Now that Postfix is installed and configured to use SSL/TLS, we can tell the operating system to forward system mail. Edit '/etc/aliases':
sudo nano /etc/aliases
At the bottom of the file, you will see a section that says "#Person who should get root's mail". Under that section, add the following line:
root: your@email_address.com
You can add additional entries for other users using the same format. Load changes to the file by running:
sudo newaliases
You can test that email forwarding is working:
				sudo yum install mailx

				echo TEST | mail -s "Test Subject" root